AI Summary




TL;DR
- Set up Housecall Pro in workflow order, not settings order. Map how a job actually moves through your business first, then configure the account to match it.
- The correct build sequence is Business Settings, then Users and Permissions, Customer Data, Services and Price Book, Estimates, Scheduling and Dispatch, Customer Communications, Payments, QuickBooks and Integrations, Automation, Reporting, Testing, and Go Live.
- Every setting either supports the field workflow or gets in its way. We only configure what changes how a job is booked, dispatched, completed, invoiced, and paid.
- QuickBooks Online sync requires the Essentials plan or higher. It is not available on Basic. Decide the source of truth for customers, items, and taxes before you connect it.
- Field Tech users work only in the mobile app. They cannot log into the web portal, and you can only edit permissions on the web.
- The single biggest setup failure we see is going live without one complete end-to-end test. Run a full lead-to-payment-to-QuickBooks test before you switch off the old system.
- Verified 2026 pricing (annual billing): Basic is about $59 per month, Essentials is about $149 per month, and MAX is about $299 per month. Monthly billing runs roughly 20 to 25 percent higher.
You can fully configure a Housecall Pro account and still leave your office doing half the work manually. We see it when dispatchers send “on my way” texts themselves, estimates vary because the price book was never finished, or QuickBooks numbers don’t line up with Housecall Pro. These problems usually start with the setup sequence, not the software.
Housecall Pro works best when you build it around the way a job moves through your business: from the first call and estimate to scheduling, dispatch, job completion, and payment. The exact setup will differ between an HVAC company, a plumbing shop, and a cleaning business, but the dependencies between each part still matter.
The sections below walk through that sequence, including what to configure, what needs to be in place first, common mistakes, and how to test everything before your team starts using it with customers.
What Should You Set Up First in Housecall Pro?
Set up your job workflow first, before you touch a single setting. Housecall Pro is designed as field service management software for home service teams, and it works best when the account is built around real operations rather than configured feature by feature.
Every account we rebuild that felt “broken” was actually built in the wrong order, with settings configured before anyone decided how work should move through the business.
Housecall Pro is a system of dependencies:
- Scheduling rules depend on business hours.
- Online booking depends on scheduling rules.
- Payments depend on bank verification.
- Reporting depends on tags that need to exist before the first job is created.
Build in the wrong order, and you spend weeks unwinding it.
If you are still inside the 14-day free trial, this is the moment to build the account correctly rather than clicking through the guided onboarding and hoping it sticks. The steps below follow the same sequence we use in client HCP accounts, so you can use them as a step-by-step setup from an empty account to a live one.
Step 1: Start With Your Job Workflow Before Changing Settings
Write down how one job moves from first contact to paid, in your words, using your trades. A plumbing call and a recurring commercial cleaning route move through the business very differently, and the account has to reflect that.

For a plumbing shop, a typical flow looks like this:
Lead → Customer → Dispatch → Quote → Approve → Complete → Invoice → Pay → QuickBooks
For a cleaning company running weekly routes, the flow is mostly recurring jobs.
Schedule Recurring Jobs → Assign Crews → Run Weekly Routes → Complete Service → Auto-Charge Card
Build the account around the workflow. Never bend the workflow to fit a half-configured account.
Step 2: The Right Order to Set Up a Housecall Pro Account
Follow the sequence given below because each step depends on the previous one:
- Business Settings and company profile
- Users and Permissions
- Customer Data Import
- Services and Price Book
- Estimates and proposals
- Scheduling and Dispatch
- Customer Communications and online booking
- Payments, deposits, and payouts
- QuickBooks and integrations
- Automation
- Reporting and job costing
- Full end-to-end testing
- Go Live
Step 3: Decide What Housecall Pro and Your Other Systems Will Control

Before you import anything, decide which system owns each type of data. This one decision prevents most future headaches.
In our implementations, Housecall Pro owns scheduling, dispatch, field operations, estimates, and job data. QuickBooks owns the books, the chart of accounts, and financial reporting.
Customers, services, and tax rates are the shared records that need one clear owner, or the sync creates duplicates. We settle that ownership question in writing before the first connection.
Set Up Your Business Details
Configure your company profile, business hours, and service area first, because scheduling, online booking, and customer notifications all read from these settings. Get them wrong, and every downstream feature inherits the error.
You access all of this business information from the settings gear icon in the top right corner, which opens the Account Settings page with left-rail navigation, so bookmark it early.
These three settings feed everything a customer sees, so configure them in this order before you touch scheduling. The company profile lets you set your core details once, keeping your customer information consistent across every estimate and invoice.

Pro Tip: Upload a high-resolution logo and confirm your business name matches exactly what customers already see on your trucks and website. Consistent branding across every job or estimate is what makes an automated text feel trustworthy instead of like spam.
Test an In-Area and Out-of-Area Booking
Enter an address inside your area and confirm it books, then enter one clearly outside it and confirm the system blocks or flags it. If an out-of-area ZIP still books, your boundary is not saved correctly, and you will find out the hard way when a tech is sent 90 minutes away.
Add Employees and Set Permissions
Add employees and set permissions before you build workflows around them, because roles decide who can see pricing, edit jobs, pull reports, and collect payment.
Housecall Pro has three roles: Admin or Owner, Office Staff, and Field Tech.
Give each person the lowest role that still lets them do their job, and keep Admin limited to the owner or one main operator, since Admins see everything, including all reporting and company settings.
Three access rules matter before you assign anyone:
- Field Techs work only in the mobile app and cannot log into the web portal. If someone needs web access, make them Office Staff or higher.
- You can edit permissions only on the web, never from the mobile app.
- Price book access on the mobile app requires Admin status or a Field Tech with the Edit Company Info permission, so decide deliberately whether techs can see or change pricing.
Beyond access, set a few defaults right. Don’t give every office user full financial and reporting visibility, since payroll and margin data don’t belong in front of a part-time scheduler. Assign the point of contact carefully, because the POC receives customer replies to automated text notifications in the chat section.
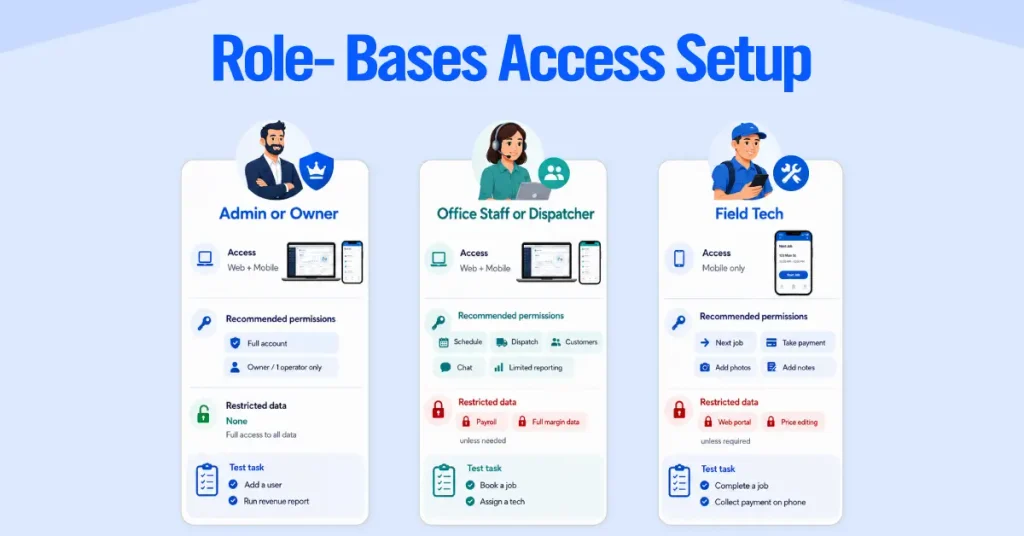
And leave “Show techs next job” on, or your techs will not see upcoming work in the app. Then test every role on the device it actually uses, Field Techs in the app, before go-live, so you do not mistake a role limitation for a bug in your first live week.
Import and Manage Customer Data and Intake
Import customer data only after you have cleaned it, because dirty data multiplies once it is in the system and starts syncing to QuickBooks. A messy import is the number one source of duplicate customers, and duplicates break reporting, notifications, and reconciliation all at once. How well you manage customer records here decides whether every existing customer has one clean history or three conflicting ones.
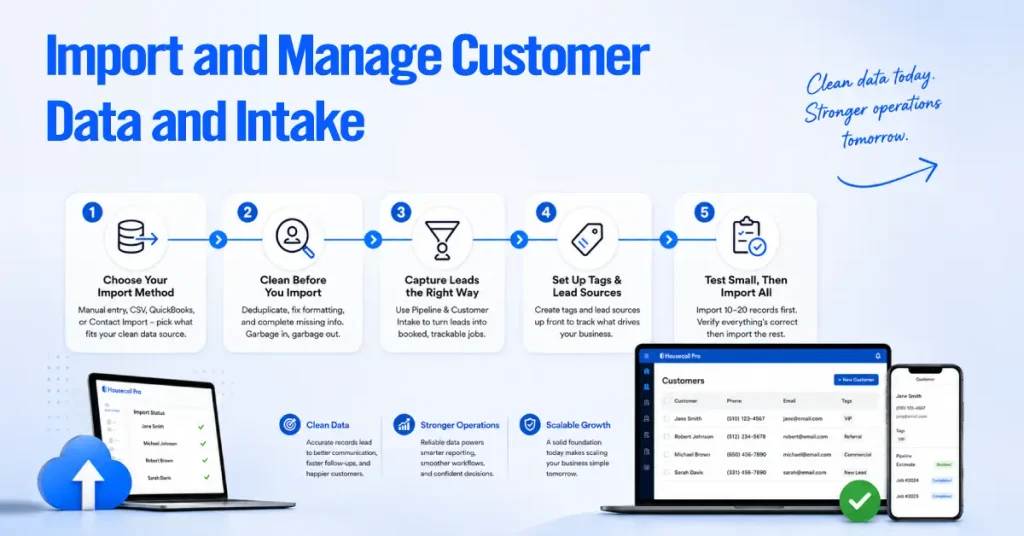
Start by deciding your source of truth. If QuickBooks owns customers, deduplicate and fix formatting there before you export, so the two systems agree from the first sync. A few steps we never skip before moving the full database.
- Deduplicate and standardize names, addresses, phones, and emails. One plumbing customer saved as “Bob Smith,” “Robert Smith,” and “R Smith” becomes three records, three histories, and three sets of notifications.
- Create tags and lead sources first, so records are labeled on the way in. Lead source is what later tells you whether Google, referrals, or repeat customers drive revenue, and tags feed segmentation, reporting, and checklist automations. Keep the vocabulary short.
- Set up Pipeline and Customer Intake so new leads enter cleanly, not on a sticky note. Once a prospect is converted, every note and job lives on that customer’s profile.
- Import 10 to 20 records as a test and confirm every field is mapped, then bring in the rest. A bad mapping on 15 records is a five-minute fix. The same failure on 4,000 records is a weekend.
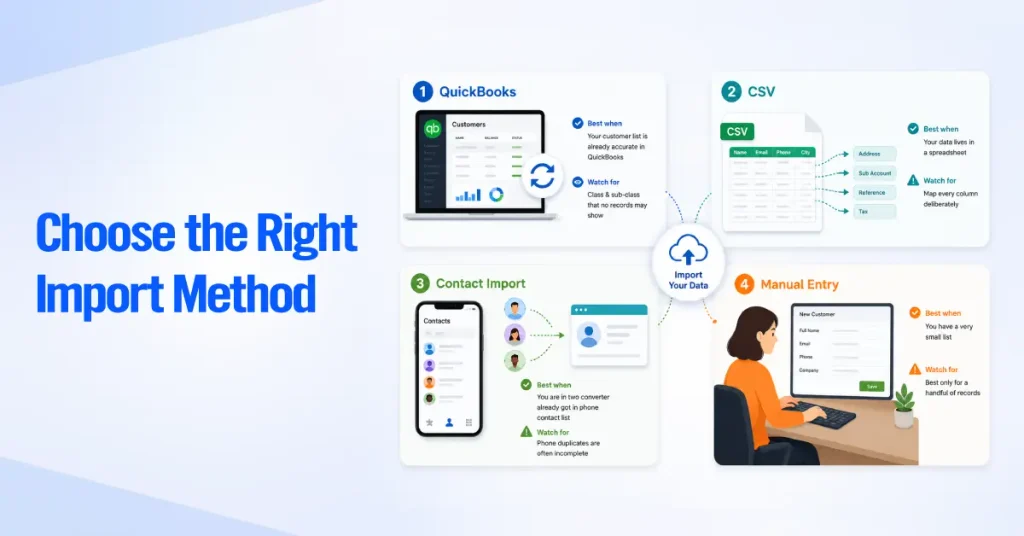
Then choose the import method that matches where your clean data already lives.
Build Your Housecall Pro Price Book
Build the price book around how you actually quote and invoice, because it drives estimate speed, pricing consistency, job costing, and technician confidence in the field. An incomplete price book makes estimates slow, inconsistent, and often underpriced, and it is the single most common gap we find in established accounts.
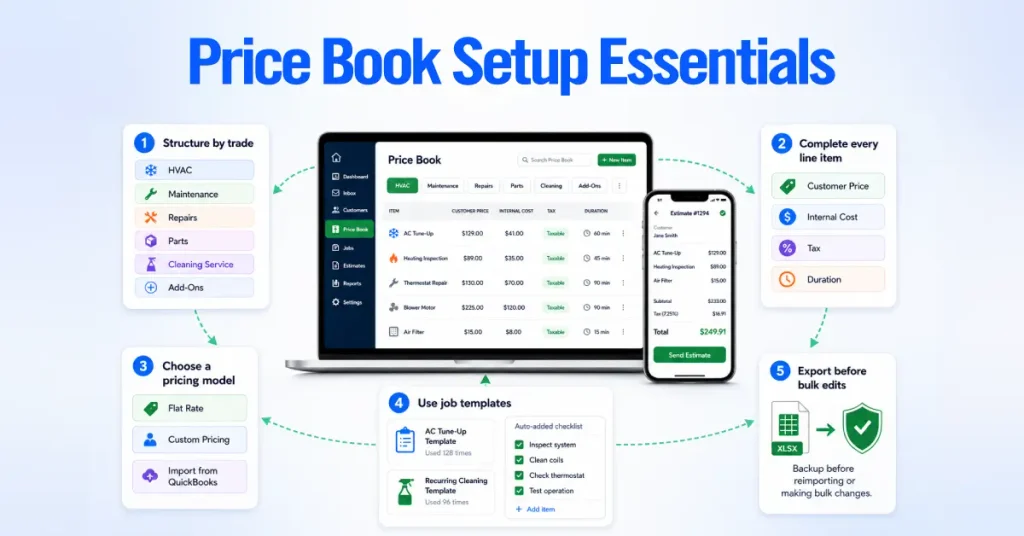
Organize by the categories your team already thinks in, then fill in the details that make estimates, scheduling, and job costing work. Here is what every price book needs.
- Structure it the way your trade does. For an HVAC shop, that means system types, maintenance, repairs, and parts. For a cleaning company, it means service levels and add-ons. If a tech cannot find the right line item in seconds, the price book gets bypassed.
- Enter the customer price, your internal cost, the correct tax, and a realistic duration on every service. Cost makes job costing possible later, and duration makes scheduling accurate. Skip cost now, and you lose job-level profitability for good.
- Pick your pricing model. Flat rate lets you present set rates by item, service, or job type and suits trades that quote at the door. Custom pricing fits variable scopes. Imported pricing brings your existing QuickBooks item list straight in. Manage flat rate services and materials on the web, where you see full labor hours and markups.
- Build templates for repeatable jobs so the right line items, durations, and checklists load automatically. Never rebuild a recurring cleaning job or standard AC tune-up from scratch. Checklists set to auto-add attach to new jobs and estimates, every recurrence of a recurring job, and any job converted from an approved estimate.
- Export the price book before any bulk edit or reimport. Bulk changes are fast and unforgiving, and a backup is the difference between a two-minute undo and rebuilding pricing by hand.
Configure Estimates and Sales Proposals
Set up estimates before scheduling, because many jobs will start as an approved estimate, and approval settings determine how quickly quotes turn into booked work. Slow, manual estimates cost revenue at the exact moment a customer is ready to say yes.
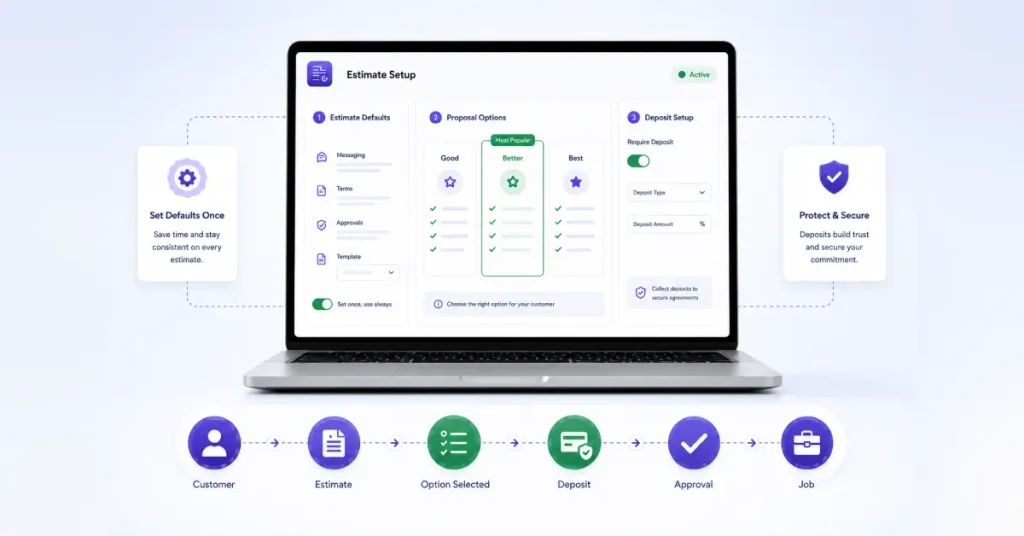
Set defaults once, build tiered options, and connect deposits to your payment setup. These are the pieces that matter most.
- Configure your default estimate expiration, messaging, and terms of service once, so a tech in the field is not rewriting terms on every job or estimate, and every customer sees the same document across all of your jobs and estimates.
- Build tiered options on a single estimate so the customer chooses between good, better, and best, since one price with no alternative is only a yes or no. The visual sales proposal tool that builds side-by-side comparisons is a MAX plan feature, so confirm your tier first. Each option pulls from your price book line items.
- Turn on deposits for jobs where you want money committed before work starts, which protects you on larger installs and custom work. Deposits depend on completed bank verification in the payments step, so test the two together.
Test it by sending yourself an estimate, approving it, and confirming it converts into a job with the correct line items, duration, and any auto-added checklist. The path runs Customer, then Estimate, then Option Selected, then Deposit, then Approval, then Job.
Set Up Scheduling and Dispatch
Set up scheduling and dispatch around how your team really moves through a day, because this is the engine of daily operations and the area where a mismatch between the app and dispatch causes the most field frustration. Techs lose trust in the system fast when the schedule on their phone does not match what dispatch told them.

Choose a scheduling model, then set the availability, windows, and buffers that keep the field on time. These choices shape every day.
- Schedule by individual technician or by route. A plumbing shop assigning specific techs to specific calls schedules by tech. A cleaning or pest control company running fixed geographic routes schedules by route. This choice shapes every other scheduling setting.
- Set each tech’s availability, the arrival windows customers see, and buffer time between jobs for drive and setup, using realistic durations from your price book. Zero buffer guarantees late arrivals and the exact “where is my tech” calls the system was meant to prevent.
- Decide whether online bookings drop straight onto the calendar or wait for office approval. Auto scheduling is fast but only safe once service area, hours, and buffers are correct, so we start clients on manual and switch to auto after testing proves the rules hold.
- Set up recurring jobs at daily, weekly, monthly, yearly, or custom frequency. When editing a recurring job, you can choose to update only this job or this and all future occurrences, keeping changes contained to one visit or rolling them across the series.
- Assign multiple techs or a team to a single job when the work needs more than one person, rather than creating duplicate jobs, which keeps the customer record, invoice, and reporting clean.
Set Up Customer Notifications, Online Booking, and Reviews
Turn on customer notifications, online booking, and reviews only after scheduling rules are solid, because these features broadcast your scheduling to customers automatically and any error is now public. This is also where duplicate messaging problems start if you connect another communication tool.
Configure the automated messages, decide who owns replies, then open booking and reviews once the rules underneath them are proven.
- Configure appointment confirmations, reminders, “on my way” texts, and completion messages to match your voice and timing. This removes the manual work of texting “on my way” to 40 customers a day.
- Assign the point of contact who receives replies, since the POC gets replies to automated text notifications in the chat section, and a reply that lands in an unmonitored inbox can look ignored.
- Set up your online booking only once you’ve verified your service area, business hours, and buffers, and choose which services appear on your website, Yelp, and Facebook. Keep complex work like a panel upgrade as a call, not a self-serve slot.
- Turn on automated review requests with exclusions for jobs you would rather not prompt. If you run campaigns from the Marketing Center, keep those promotional sends separate from transactional job messages, since blending the two for marketing purposes trains customers to tune out your texts.
- Audit messaging before go-live if any other texting tool is connected through Zapier. When two systems both send confirmations, the customer gets doubled messages, so naming one owner per message type is the simplest way to reduce chaos.
If two systems can send the same text, assume they eventually will. Pick one owner per message and disable the rest.
Set Up Invoices, Payment Options, Deposits, and Payouts
Set up your payment options only after your bank account is connected and verified, because nothing downstream, including deposits and field payments, works until verification clears. This step turns completed work into deposited money, so treat it as core, not optional.
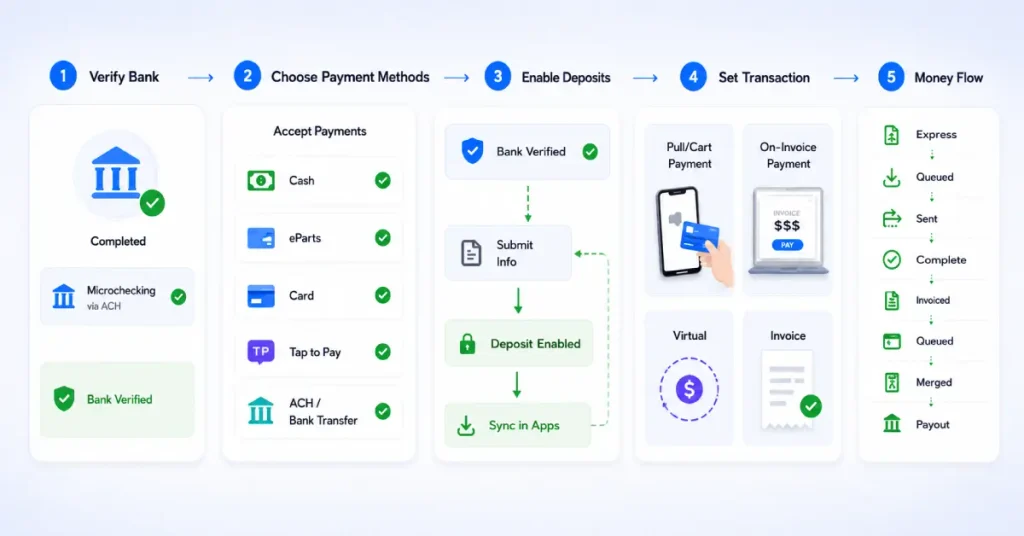
Connect and verify the bank first, then set your methods and deposits. The order matters because nothing settles until verification clears.
- Connect your bank and complete verification first. It can take a few days, so start early, and until it clears, deposits and card payments will not settle.
- Decide which methods you accept, including cash, check, card, text-to-pay, and consumer financing. Processing runs roughly 2.59 percent to 3.49 percent for cards depending on how the card is entered, and about 1 percent for bank ACH, so the fee spread tells you what to steer larger jobs toward.
- Configure deposits so larger jobs and online bookings collect up front. Deposits depend on completed bank verification and connect back to your estimate settings, so test the estimate, deposit, and payment pieces together.
Test a real low-value transaction through every path before go-live: a field card payment on the mobile app, an online payment from an invoice, a refund, and a receipt. The money path runs Estimate, then Deposit, then Job, then Completion, then Invoice, then Payment, then Receipt, then Payout.
Connect Housecall Pro to QuickBooks Online
Connect QuickBooks only after both systems are clean, and you have decided what each one controls, because the sync will faithfully copy your mess in both directions if you let it.
QuickBooks Online sync requires the Essentials plan or higher and is not available on Basic. Data ownership, sync behavior, and reconciliation are the three issues that cause the most pain here, which is why this connection deserves more care than any other integration.
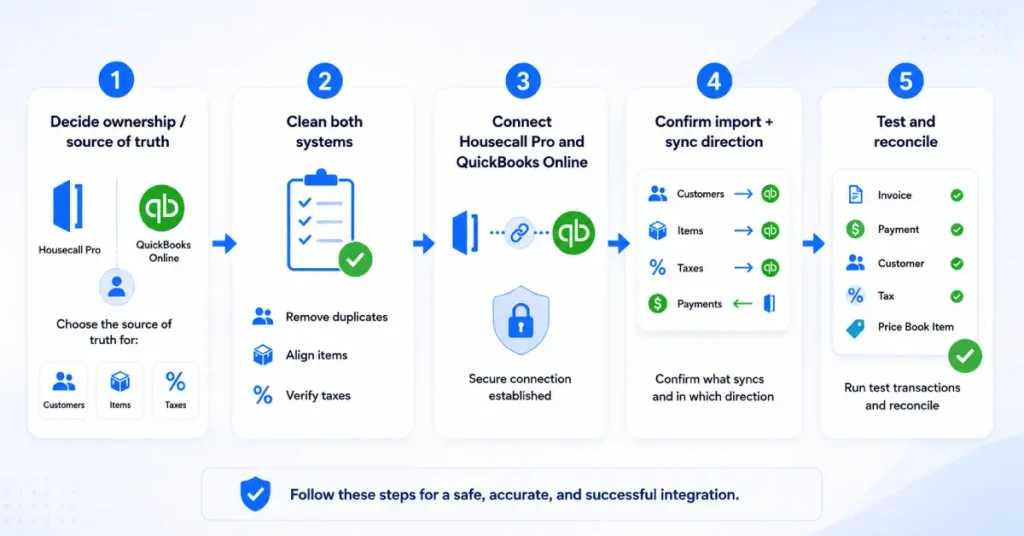
Decide ownership, clean both sides, then connect and confirm the sync direction before you trust it with live volume.
- Decide the source of truth for every shared record first. In our implementations, Housecall Pro owns the field workflow, and QuickBooks owns the books, while customers, service items, and tax rates each need one named owner. Skip this and the sync creates duplicate customers and mismatched items that take hours to unwind.
- Clean both sides before connecting. Deduplicate customers, align service items, confirm tax rates match, and verify your chart of accounts is correct in QuickBooks.
- Connect, then choose deliberately what to import, whether customers, the item list, or job history. Import only what supports your source of truth decision, since pulling everything from both sides doubles your records on day one.
- Know the sync direction for invoices, payments, customers, taxes, and price book items before you rely on it. Nothing syncs both ways instantly, and silent partial syncs are what make monthly reconciliation feel like detective work.
Test an Invoice, Payment, Customer, Tax, and Price Book Item
Push one of each through and reconcile it by hand. Work this checklist in order.
- Source of truth: Confirmed in writing for customers, items, and taxes
- Customers: One test customer syncs without creating a duplicate
- Accounts: Income and payment accounts map to the right chart of accounts entries
- Taxes: A taxable line item carries the correct rate into QuickBooks
- Price Book: A synced item matches name, price, and account on both sides
- Invoice: A test invoice appears in QuickBooks with correct totals
- Payment: A test payment applies to the right invoice, not as an orphan credit
- Duplicate Check: No duplicate customer, item, or invoice was created by the test
- Reconciliation: The test transaction reconciles cleanly against the bank feed
Connect Zapier, API, and Other Integrations
Add external automation only after native Housecall Pro workflows are in place, because most of what teams reach to Zapier for is already built in. Every unnecessary integration adds another place records can duplicate, and notifications can double.
Use the native tools first, reach for Zapier only for what they cannot do, and reserve the API for truly custom work.
- Exhaust the built-in tools first. Automated notifications, recurring jobs, checklists, and estimate follow-ups are native, and native workflows do not break the way external chains do when a field name changes. One reason teams choose Housecall Pro over alternatives like Jobber is the depth of its native QuickBooks sync, so lean on that to streamline your business operations before you bolt anything on.
- Use Zapier as the no-code bridge for connections Housecall Pro does not offer natively, like a niche CRM, a spreadsheet, or a marketing tool, and map every field deliberately, since a loose mapping quietly writes bad data into two systems at once.
- Reserve the open API for genuinely custom needs Zapier cannot cover. Full API access is a MAX plan feature and a maintenance commitment, so confirm your tier and use it only where it clearly earns its keep.
- Test the failure modes, not just the happy path. Trigger an error, create a record that could duplicate, and watch for double notifications, because integrations fail silently and you want to find that in testing, not when a customer gets three identical texts.
Set Up Housecall Pro Automations
Automate the repetitive, low-risk work first, and keep anything that needs judgment under human review. The goal is to remove data entry and manual texting, not to remove decision-making. Automation applied to the wrong step turns a small error into a fast, repeated one.
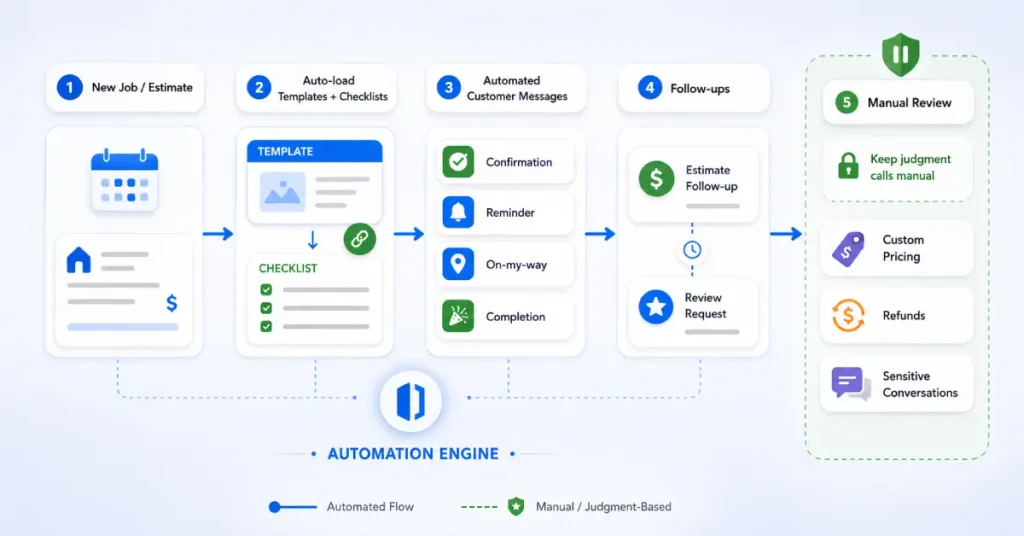
Automate the predictable work, keep judgment calls manual, and let the table below draw the line.
- Automate appointment confirmations, reminders, “on my way” texts, and completion messages. This is the highest-value, lowest-risk automation in the account, and it removes hours of manual texting from the dispatcher’s week.
- Use job templates that preload line items, durations, and checklists so a standard tune-up, a recurring clean, or a common repair loads complete for both office and tech.
- Set checklists to add themselves automatically. The auto add toggle attaches a template to new jobs and estimates, every recurrence of a recurring job, and any job from an approved estimate. The newer rules-based Checklist Automations, in beta on some accounts, add checklists based on tags, job types, business units, and line items whenever a new job is created. Editing is web-only, while techs view and complete them on mobile.
- Automate follow-ups on open estimates and review requests after completed jobs, since chasing estimates by hand never happens consistently and an automated sequence recovers quotes that would go cold.
- Keep custom job pricing, refunds, and sensitive customer conversations manual. Automation should handle the predictable, not the judgment calls.
Set Up Reporting and Job Costing
Set up your reporting structure before you need the reports, because revenue, job, and profitability reporting all depend on tags, job types, lead sources, and cost data that must exist before jobs are created. You cannot report your way back to data you never captured.
Build the labels and cost data first, then build the reports and the views each role needs.
- Define job types, tags, lead sources, and business units up front as the backbone of every report. These labels drive segmentation and checklist automations, and tracking lead source from day one shows whether marketing spend pays off.
- Enter labor and material costs so job costing works. Without cost, you can report revenue but never profit, which hides the jobs quietly losing money, so enter cost, not just price, back in the price book.
- Build the reports you will actually act on, covering revenue, job volume, estimate conversion, and profitability. Advanced reporting and the Business Insights tools sit on the MAX plan, so if deep reporting is why you are on MAX, use it rather than pay for it and run like a basic tier.
- Create role-specific views. An owner needs revenue, margin, and conversion at a glance. A dispatcher needs today’s schedule, open jobs, and unassigned work.
Test Your Housecall Pro Setup Before Going Live
Run one complete end-to-end test before you go live, because a full workflow test is the single most important step and the one most setups skip. Testing each feature in isolation misses the handoffs between them, and the handoffs are where accounts break.
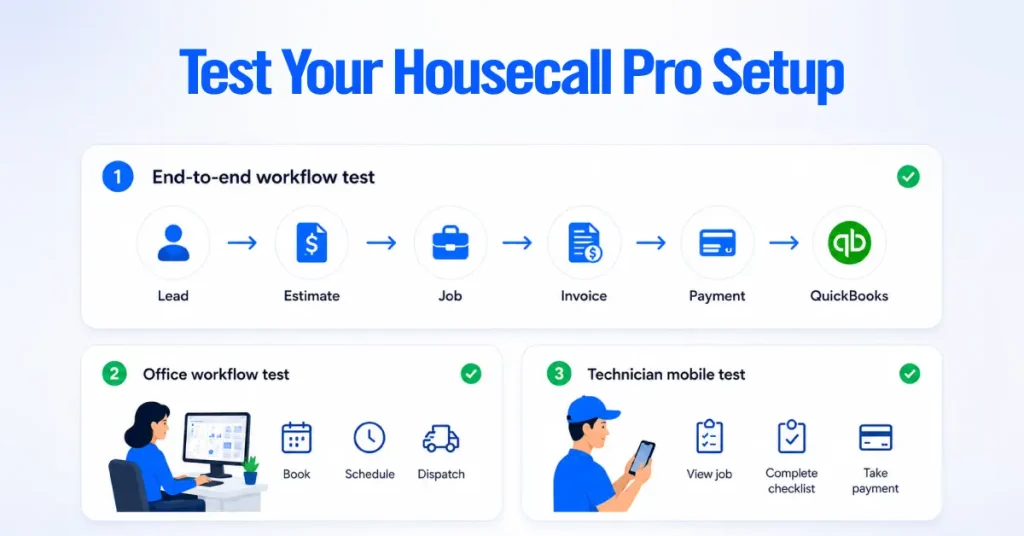
Run each of these tests once before go-live. Handoffs are where accounts break, so test the whole chain, not just the parts.
- Push one test customer and job through the entire lifecycle: Lead, then Customer, then Estimate, then Deposit, then Job, then Schedule, then Dispatch, then Technician, then Invoice, then Payment, then Review, then QuickBooks.
- Have office staff book, schedule, dispatch, and follow up exactly as they will on a live job, which confirms permissions, scheduling rules, and notifications for the people who use them all day.
- Have a real tech run the job on the mobile app, the only place Field Techs work, and confirm they can see the job, complete the checklist, add photos, and take payment on the phone.
- Send yourself the customer-facing messages and documents, and confirm the confirmation, reminder, “on my way,” estimate, invoice, receipt, and review request all arrive branded and on time.
- Test the failure paths too: a refund, a failed sync, and a duplicate trigger, while a mistake still costs nothing.
Most “Housecall Pro is broken” complaints are really “Housecall Pro went live without one full test.” The end-to-end run is the cheapest insurance in the entire setup.
Go Live Without Disrupting Your Existing Operation
Go live in a controlled, phased way rather than switching everything at once, because a hard cutover across the whole business turns small setup gaps into simultaneous fires. A phased launch keeps problems small and fixable.
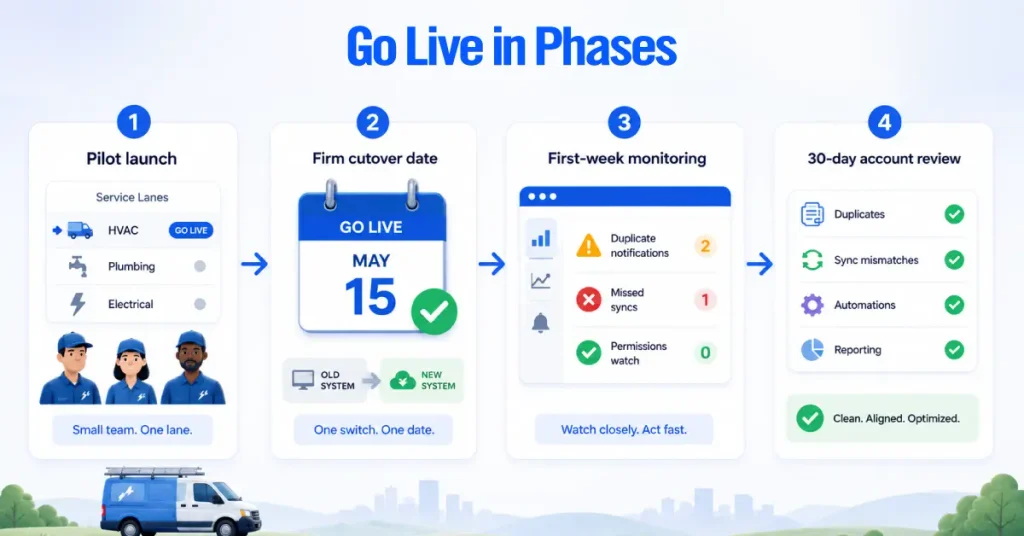
Launch in phases so small gaps stay small, and give yourself two checkpoints after the switch.
- Launch with a single service type or one technician group first. A plumbing shop might run all drain calls through Housecall Pro for a week before moving the rest, so any issue affects a slice of the business, not all of it.
- Set a firm cutover date to retire the old system, or staff will quietly default to the familiar one and the new account will never get real use.
- Watch the first week for gaps that only surface under live load, like duplicate notifications, missed syncs, and permission surprises. Catching them in week one is routine. Catching them in month two means weeks of bad data to clean.
- Run a full account review at 30 days for duplicate customers, sync mismatches, misfiring automations, and reports pulling the numbers you expect. The 30-day cleanup is what turns a working setup into a reliable one.
Use Housecall Pro Onboarding and Pro Power Hour to Grow Your Business
Lean on Housecall Pro’s built-in training after go-live, because a configured account only pays off when your team actually uses it well. New Pros get guided onboarding, and Housecall Pro also runs Pro Power Hour, a feature-focused training series led by its onboarding specialists that walks through one part of the platform at a time. These sessions are a low-cost way to keep your HCP account sharp as the product changes.
Use Housecall Pro’s training to close the gap between a setup that technically works and a setup that helps you grow your business. The service professionals who get the most from the platform treat setup as the start, then keep refining their price book, automations, and reporting on proven workflows.
That habit is what keeps the business running smoothly instead of drifting back to spreadsheets and manual texts.
When Should You Use a Housecall Pro Consultant?
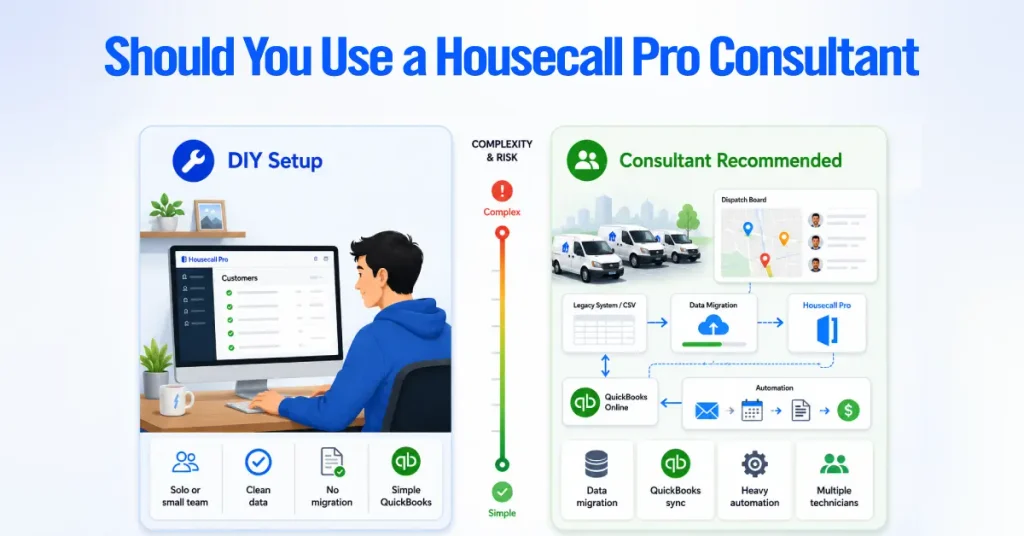
Bring in a consultant when the setup involves data migration, QuickBooks, heavy automation, or multiple technicians, and handle it yourself when the account is small and clean. The dividing line is complexity and risk, not budget alone. A solo handyman with a short customer list rarely needs help. A multi-truck HVAC company migrating years of QuickBooks history usually does.
When DIY Housecall Pro Setup Makes Sense
Set it up yourself when you are a solo operator or a small team, your customer data is clean, you are not migrating from another system, and your QuickBooks needs are simple. The build is very doable in-house when there are few moving parts.
When Migration, QuickBooks, Automation, or Multiple Technicians Make Setup More Complex
Get help when several of these are true at once. Migrating live data from another platform, connecting QuickBooks with years of existing records, building multi-step automations, dispatching multiple techs and crews, or standing up recurring service plans each add risk, and stacking them is where DIY setups tend to stall or go live half built.
What a Housecall Pro Implementation Consultant Should Deliver
A real implementation covers the whole account, not just a login and a login-screen tour. Use this checklist to judge scope before any paid work begins.
- Workflow: Your actual job flow mapped before any setting is touched
- Account Setu: Company profile, hours, and service area configured and tested
- Permissions: Roles set correctly, with Field Techs verified on mobile
- Customer Data: Cleaned, deduplicated, and imported without duplicates
- Price Book: Built with price, cost, tax, and duration on every item
- Templates: Job templates and checklists for your repeatable work
- Dispatch: Scheduling model, arrival windows, and buffers set to reality
- Payments: Bank verified and every payment path tested
- QuickBooks: Source of truth defined, connected, and reconciled on test records
- Automations: The right work automated, the risky work left manual
- Reports: Tags, costs, and role-specific views in place
- Testing: One complete end-to-end run before go-live
- Training: Office and field trained on the device each one uses
- Go Live: A phased launch with a cutover date and a 30-day cleanup