AI Summary




TL;DR
- Set up Calendly in order. Map the booking flow, connect your calendar, set availability, build event types, then add routing, CRM, and payments.
- Calendly blocks times based on your calendar events’ free/busy status. By default, it treats Busy events as conflicts and ignores Free events; in Outlook or Microsoft 365, you can also make Tentative, Working Elsewhere, and Away count. All-day Busy events can block a whole day.
- Calendly’s tiers for new customers are Free, Standard, Teams, and Enterprise. The older Essentials and Professional names were retired, though some help articles still reference them for existing accounts.
- Group and Collective event types unlock on Standard. Routing Forms, HubSpot and Salesforce lookup routing, and the Salesforce integration require Teams and above. Round Robin availability has shifted, so confirm it on the live pricing page.
- Calendly automatically stores every invitee in Calendly Contacts, so a booking always creates a record somewhere, even before you connect a CRM.
- Never publish without a full test booking on both mobile and desktop, checking the calendar, confirmation, reminder, CRM record, and payment.
Calendly makes scheduling fast to switch on, but a quick setup is not always a good setup. Double bookings, missed meetings, awkward availability, and demo requests reaching the wrong rep usually come down to how you configure calendars, event types, routing, and scheduling rules.
This step-by-step Calendly tutorial walks through the setup in the order that makes the most sense for a business. It covers how to set up a Calendly account, connect your calendar to Calendly, define availability, create event types, automate meeting management, route meetings, and add integrations where they are actually useful.
Calendly is scheduling software that lets you schedule meetings without endless back-and-forth, and a few early configuration choices make a much bigger difference than they first appear.
The goal is a booking flow that accurately reflects your team’s availability, sends each meeting to the right place, and streamlines the scheduling experience for both your team and the person booking.
Which Calendly Plan Do You Need to Schedule Meetings?
Pick the plan based on the features your setup actually requires, not team size alone. Calendly’s current tiers for new customers are Free, Standard, Teams, and Enterprise. The Free plan gives you a free account with basic scheduling, while paid tiers unlock team scheduling and integrations. Calendly retired the Essentials and Professional names, though you may still see them in older help articles and on some legacy accounts.
The table below maps plans to the setup-relevant capabilities in this guide. Prices are as of mid-2026 and should be confirmed on Calendly’s pricing page, since Calendly has adjusted both names and feature gating throughout the year.
| Plan | Best for | Calendars and event types | Team and routing | CRM and payments | Approx price |
|---|---|---|---|---|---|
| Free | One person, one meeting format | 1 event type, one calendar | None | None | – |
| Standard | Solo pros and small teams | Unlimited event types, multiple calendars, Group and Collective | Basic team events, Workflows | Stripe, PayPal, HubSpot logging | Around 10 per seat monthly, billed annually |
| Teams | Sales, recruiting, support teams | Everything in Standard | Routing Forms, HubSpot and Salesforce lookup, admin controls | Salesforce integration | Around 16 per seat monthly, billed annually |
| Enterprise | Large or regulated orgs | Everything in Teams | SAML SSO, SCIM, advanced governance | Same, plus security controls | Custom, from roughly 15,000 per year |
What Should You Set Up Before Creating Your Calendly Links?
Decide what the booking should do before you create a single Calendly link. The link is the last thing you build, not the first.
Map What Happens From Booking to Follow-Up
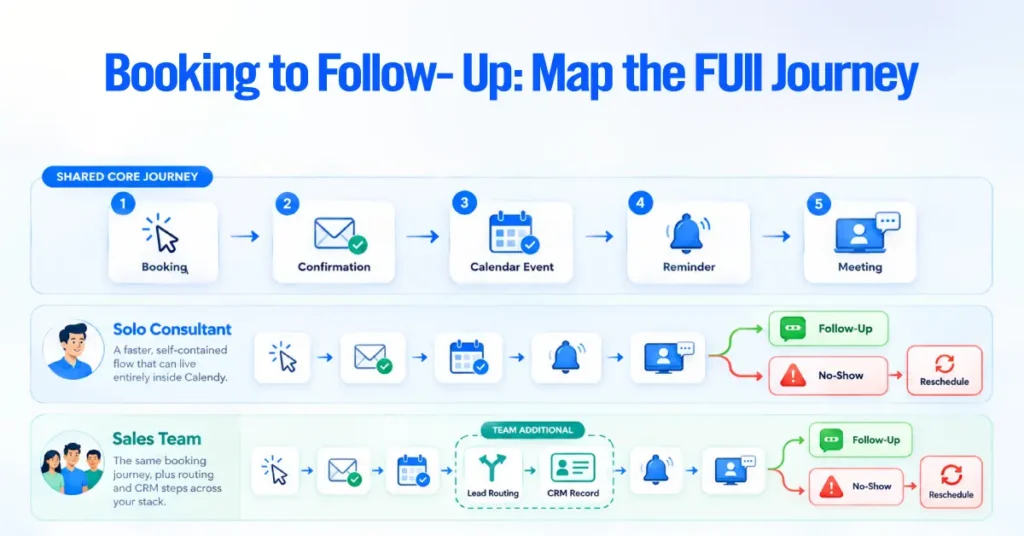
Write down the full journey a booking takes, from the click to the follow-up after the meeting. A minimum map is booking, confirmation, calendar event, reminder, meeting, then either a follow-up or a no-show and reschedule.
For a solo consultant, that map is short and lives entirely inside Calendly. For a sales team, the same map adds branches for lead routing and a CRM record. Mapping first tells you which tool owns each step before you configure anything.
Choose the Right Calendly Setup for Your Business
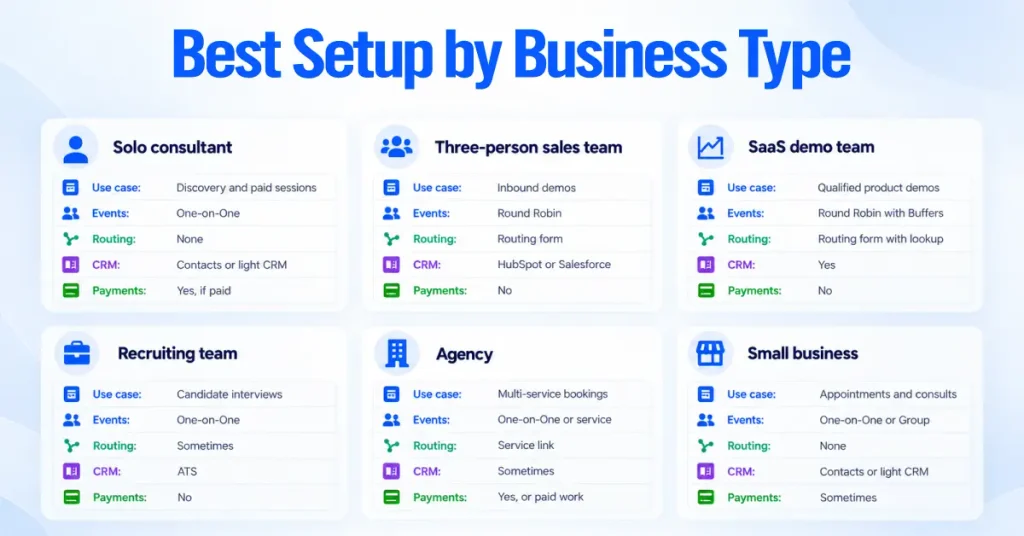
Here is how 6 common business types break down.
- Solo consultant. One connected calendar, two or three event types, payments if you sell paid sessions, and reminder workflows.
- Three-person sales team. Round Robin for inbound demos, a routing form to qualify, and a CRM record on every booking.
- SaaS demo team. A routing form to filter fit, distribution to the right segment owner, and a Collective event type for demos that need a solutions engineer alongside an account executive.
- Recruiting team. One-on-one interview event types with meeting limits, prep buffers, and sync to your applicant tracking system.
- Agency. Separate event types per service line, payments on paid audits, and each team member connecting their own calendar.
- Small business. One or two service event types, in-person or phone locations, and reminders to reduce no-shows.
Match the setup to how people actually book with you.
Decide Which System Owns the Booking and Customer Record
Choose one system as the source of truth for the customer record before you connect anything. Calendly can own the booking, but a CRM should usually own the wider customer relationship. Note that Calendly does not leave you empty-handed if you have no CRM.
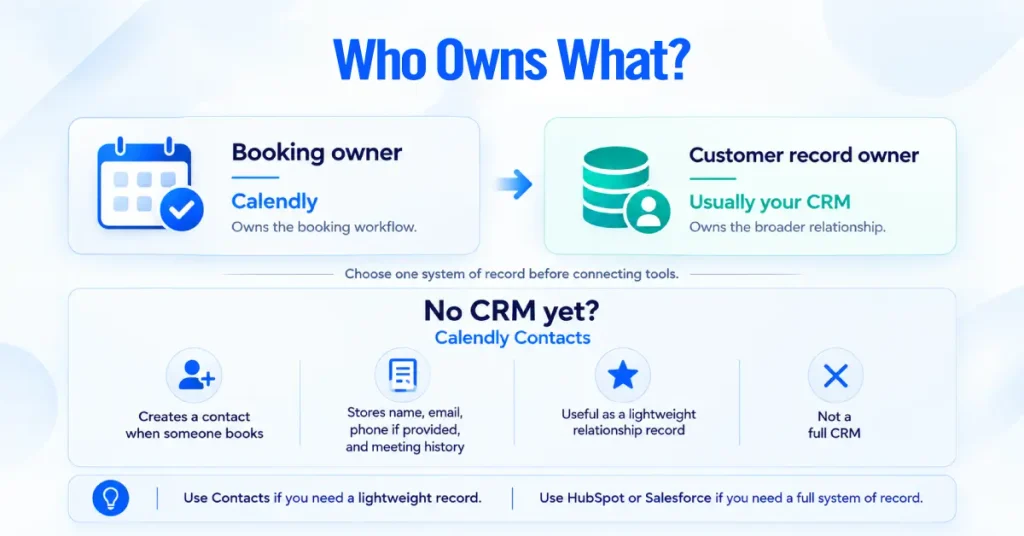
Calendly Contacts automatically creates a contact profile whenever someone books, storing name, email, phone if provided, and meeting history. It is a lightweight relationship record, not a full CRM, so decide early whether Contacts is enough or whether HubSpot or Salesforce should be the system of record.
Connect Your Calendar to Calendly Account
Connect the calendar that holds your real meetings and commitments, then choose exactly which calendars Calendly should check for conflicts. Connecting a calendar alone does not prevent double bookings; your conflict settings do.
Calendly supports Google Calendar, Outlook, Office 365, and Exchange. To learn how to connect a calendar, open Calendar settings after connecting your account and configure two things. New iCloud connections were discontinued in 2024, so Apple users generally route iCloud through Google Calendar or an Outlook calendar.

Choose Calendars for Calendly to Check for Conflicts
Under Check for conflicts, select every calendar that contains time you want protected. Calendly checks multiple calendars, but if you do not select a secondary or shared calendar, bookings can still overlap with events on it. This is also how Calendly can sync meetings across the calendars you rely on.
Microsoft accounts have additional limits. Conflict checking supports up to four sub-calendars, and Calendly may only display the first ten calendars Microsoft returns.
Choose Where New Bookings Are Added
Calendly can check several calendars for conflicts but adds new bookings to only one. Set your primary work calendar as the destination so scheduled meetings appear where you expect them.
Test for Double Bookings
Create a Busy event on your connected calendar and confirm that time disappears from your Calendly booking page. Then schedule a test meeting and verify that it appears on the correct calendar.
Calendly primarily uses an event’s free/busy status when checking availability. Busy events block time, while Free events generally do not. If Calendly is booking over existing commitments, first confirm that the event is marked Busy and that its calendar is included under Check for conflicts.
Tip. Free/busy rules can allow bookings over selected events when needed, but some event types and full Group meetings may have restrictions.
Set Your Calendly Availability and Booking Rules
Set availability around how you actually want to work, not around maximizing open slots. Clear booking rules protect focus time, help you manage your time, prevent last-minute appointments, and keep your calendar manageable. These availability settings shape the real scheduling experience.
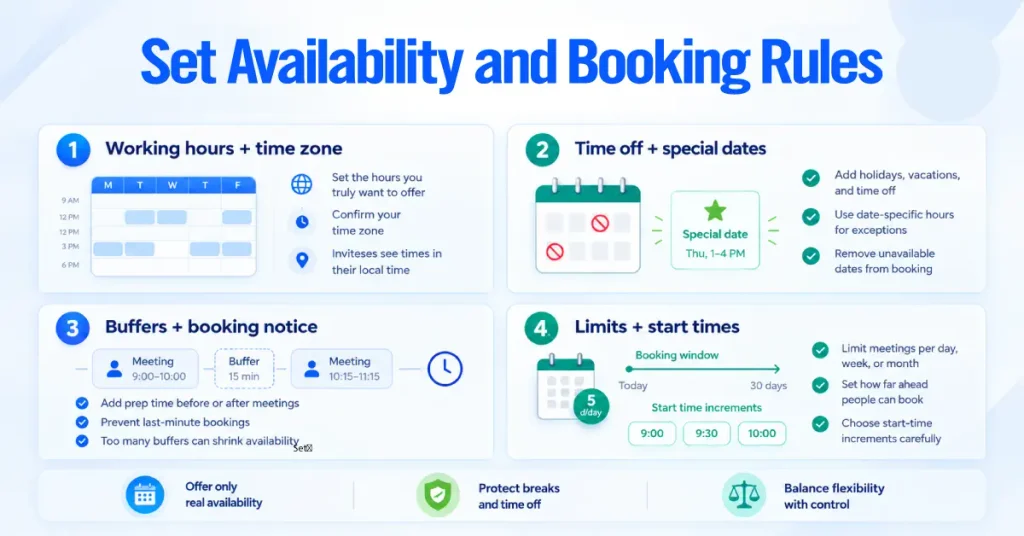
Set Working Hours, Time Zones, and Time Off
Start with the hours you are genuinely available for meetings and confirm your time zone. Calendly automatically adjusts available times for each invitee’s local time zone, and locking time zones keeps your schedule fixed when you need it.
Add holidays, vacations, and other time off so those dates are removed from your booking availability.
Add Date-Specific Availability
Use date-specific hours when a particular day needs to differ from your normal schedule. For example, if you usually work standard hours but only want to run demos on certain afternoons, you can adjust those days and times without changing your regular availability.
Add Buffer Times and Minimum Scheduling Notice
Buffer times between meetings create breathing room before or after a call and give you time to prep, while minimum scheduling notice prevents people from booking too close to the start time.
Open the relevant event type and go to More options, then Limits and buffers, to customize buffer settings.
Use buffers carefully. Adding both a before and after buffer to short meetings can remove more availability than expected. If your booking page suddenly looks too empty, review these settings first.
Set Meeting Limits and Booking Date Ranges
Use meeting limits to control how many bookings you accept per day, week, or month. This is useful when certain meetings, such as interviews, demos, or consultations, should not take over the entire calendar.
You can also control how far in advance people can book. A shorter booking window works well when schedules change frequently, while a longer window can suit appointments planned well in advance.
Control Available Start Times
Start-time increments determine how frequently booking slots appear. A 30-minute increment might offer 9 am, 9.30 am, 10 am, and so on.
Smaller increments give invitees more options, but they can also fragment your calendar. Choose an interval that gives people enough flexibility without breaking your day into awkward gaps.
Why Does Calendly Show a Time as Unavailable?
A time shows as unavailable because a rule is blocking it, and the fix depends on which rule. Calendly groups the causes into a calendar conflict, a reached meeting limit, a buffer from a nearby meeting, a minimum notice window, or a holiday. To identify time-blocking issues on a specific slot, open the event type, select Preview, then Troubleshoot, and pick the date and time to see the exact reason.
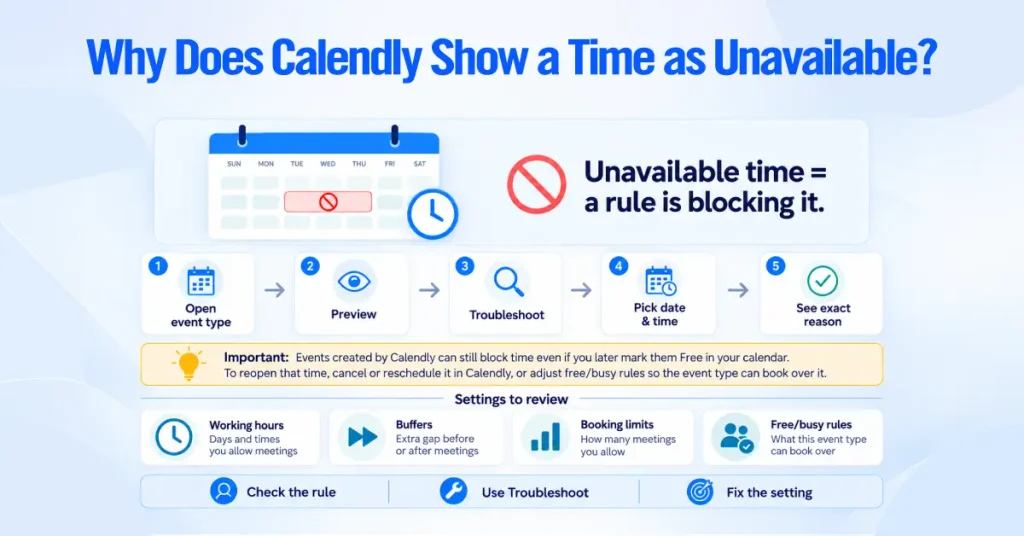
One cause surprises people. Events Calendly created keep blocking their times even if you later mark them Free in your calendar. To reopen those times, cancel or reschedule the event inside Calendly, or set Free/busy rules so the event type can book over them.
Create an Event with the Right Calendly Event Types
Build event types around why someone is booking, not just how long the meeting lasts. Each event type controls the meeting’s duration, availability, location, hosts, and booking questions, which is how Calendly handles different meeting types from one account.
Choose the Right Event Type
Create an event for each clear booking purpose, then choose the format that fits.
- One-on-One. One host and one invitee. Best for most individual meetings.
- Group. One host with multiple invitees in the same time slot, such as webinars or training sessions.
- Collective. Multiple hosts meet with one invitee, and all hosts must be available.
- Round Robin. Distributes meetings across a team based on availability or assignment rules.
Choosing the wrong format can cause unexpected booking behavior. For example, a Group event is designed to accept multiple invitees in the same slot.
Name Events by Booking Intent
Use names that immediately explain what the invitee is booking. Product Demo or Free Website Audit is far clearer than 30-Minute Meeting.
Optimize the Essentials
Before sharing an event, confirm its duration, availability, location, and host. Team events deserve extra attention here, since an incorrect host or availability schedule can send meetings to the wrong person or calendar.
| Event type | Hosts | Invitees | Best use case |
|---|---|---|---|
| One-on-One | 1 | 1 | Discovery calls, consults, interviews |
| Group | 1 | Many | Webinars, trainings, info sessions |
| Collective | Multiple | 1 | Panel interviews, multi-host demos |
| Round Robin | Rotates | 1 | Inbound sales and support distribution |
Set Up Meeting Locations and Booking Questions
Set the meeting location and collect only the information you actually need before the call.
Choose the Meeting Location
For each event type, choose where the meeting will happen. Calendly integrates with Zoom, Google Meet, and Microsoft Teams and can automatically create links for virtual meetings. You can also use a phone call or an in-person location.
After setting it up, make a test booking to confirm the meeting link, phone number, or address appears correctly.
Add Useful Booking Questions
Keep booking questions short and purposeful. Ask only for information that helps you qualify the invitee or prepare for the meeting.
If you already collect qualification details through a routing form, avoid asking for the same information again on the booking page.
Make Canceling and Rescheduling Easy
Give invitees clear options to cancel or reschedule when plans change. This reduces unnecessary back-and-forth and can help prevent no-shows.
Set any cancellation or rescheduling rules you need, then make sure those options are easy to find in the confirmation.
Automate Reminders and Follow-Up With Calendly Workflows
Use Calendly Workflows to automate reminders and follow-up messages around your meetings.
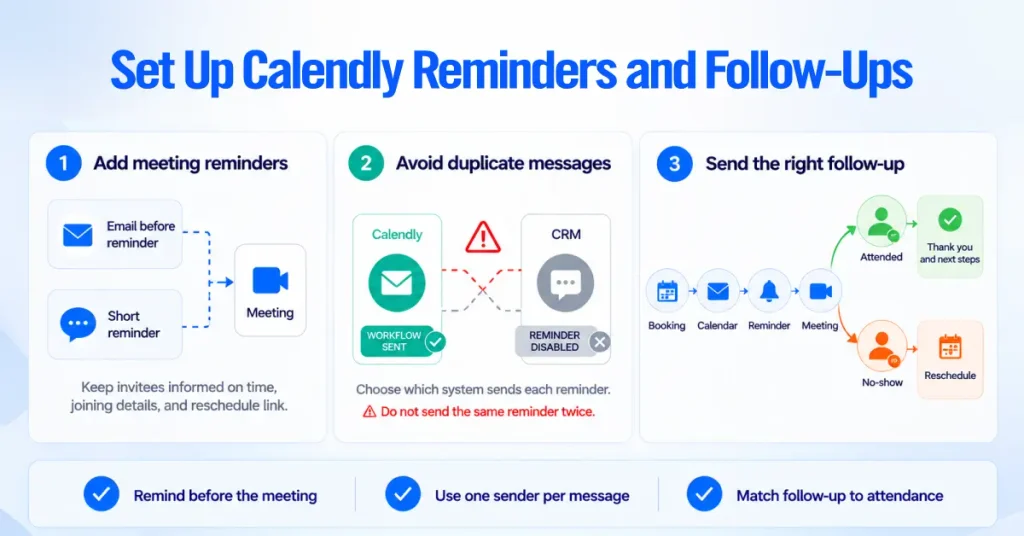
Add Meeting Reminders
Create reminder emails or text messages that go out before the meeting. A simple setup might include an email the day before and a shorter reminder closer to the meeting.
Keep reminders focused on the essentials: the meeting time, joining details, and a reschedule option.
Avoid Duplicate Messages
If your CRM also sends meeting reminders, decide whether Calendly or the CRM should handle each message.
Do not let both systems send the same reminder. Duplicate emails and texts create unnecessary noise for invitees.
Create a No-Show Follow-Up
Your follow-up should depend on whether the person attended.
Send attendees your normal thank-you or next-step message. For no-shows, send a simple rescheduling option instead of the standard follow-up.
A basic flow could look like this. Booking, confirmation, reminder, meeting, then follow-up or reschedule.
Set Up Calendly for Teams
Before creating team booking links, make sure every team member has their own Calendly user and connected calendar. Calendly for teams only works when Calendly can see each host’s real availability.
Add Team Members and Assign Roles
Invite the people who need access and give each person the appropriate permission level.
Calendly roles include Owner, Admin, Group Admin, Team Manager, and User. Keep higher-level permissions limited to people who actually need to manage users, settings, or team scheduling.
Connect Every Team Member’s Calendar
Each host should connect the calendar that contains their real meetings and availability.
Test each connection before publishing a team booking link. If Calendly cannot see a host’s actual schedule, it cannot reliably avoid conflicts.
Choose the Right Team Scheduling Type
Use the format that matches how your team handles meetings.
- Round Robin. Sends the meeting to one available team member.
- Collective. Requires multiple hosts to attend the same meeting.
- Group. Allows multiple invitees to book the same session.
Set Up Round Robin for Sales or Support
Round Robin works well when several people can handle the same type of meeting.
Add the eligible team members, confirm their availability, and choose how meetings should be distributed. For example, a sales team can use one demo link so invitees can schedule with whichever rep is available, instead of asking prospects to choose someone themselves.
Governance for Larger Teams, Managed Events and Managed Workflows
Once several people host meetings, standardize event types and communications centrally so the setup stays consistent as people come and go. Calendly’s administration lives in the Admin Center, where owners and admins manage users, groups, permissions, branding, security, Managed Events, and Workflows.
Managed Events
Managed Events let an owner or admin push a standardized event type to many users from one template. Each team member gets their own linked version. You control editing section by section, and any section you lock stays synced with your updates, while unlocked sections do not sync.
Currently, you can create One-on-One or Group event types as Managed Events, and the Location field is always editable, so leaving it blank lets each user add their own. On Teams and Enterprise, you manage editing permissions per section.
On the legacy Professional plan, you update a Managed Event by unassigning and reassigning it, which replaces the user’s version.
Managed Workflows and Permissions
Admins can standardize reminders and follow-ups across the organization rather than leaving every host to build their own. Owners and admins manage Workflows for Managed Events; admins can also manage Workflows for individual users’ personal event types, and owners, admins, and team managers can manage team event Workflows. To control who can build automations, go to the Admin Center, select Permissions, and open the Workflows tab.
Enterprise Administration
Enterprise adds identity and provisioning controls. SAML single sign-on centralizes login, and SCIM can automatically provision users into groups so onboarding and offboarding stay in sync with your identity provider. These are usually configured by an IT admin.
Route Leads to the Right Person
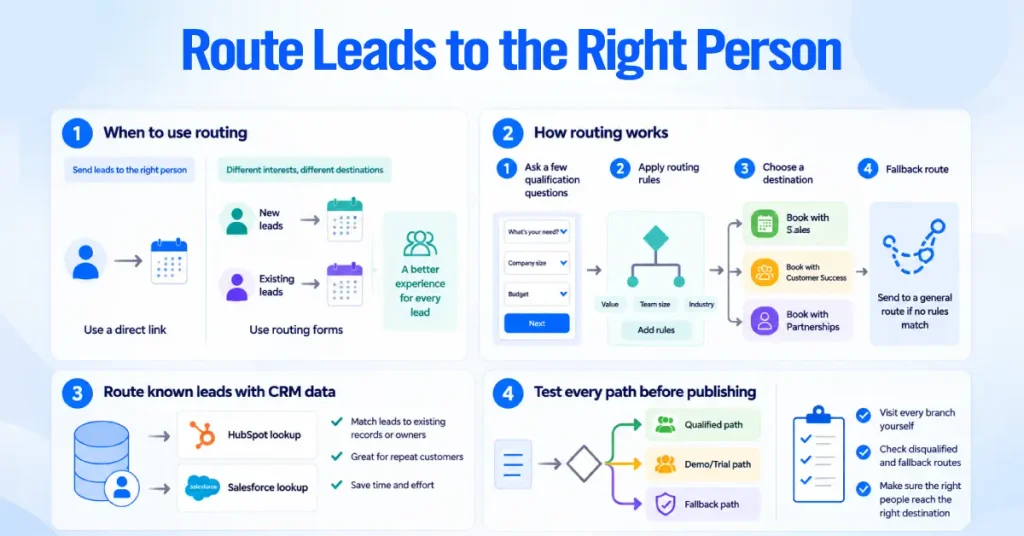
Use routing forms to qualify and direct inbound leads before they reach a calendar. A routing form asks a few questions, applies rules, and sends each person to an event type, a message, or a URL. Routing Forms are available on Teams and above.
When to Use Calendly Routing Forms
Use routing when different answers should lead to different outcomes. A single professional does not need it. A SaaS demo team does, because a solo founder and an enterprise buyer should not land on the same calendar. If everyone who books should get the same meeting, share a direct link instead.
Add Qualification Questions and Routing Rules
Ask only what decides the route, then build logic that maps answers to destinations. In the routing logic tab, create a condition by choosing a question, a qualifier, and an answer, and combine conditions with and/or. Each rule points to one of three destinations: an Event Type for qualified visitors, a Custom message for disqualified ones, or an External URL.
For known leads, you can route on CRM data rather than form answers. HubSpot lookup and Salesforce lookup match a visitor to their existing account owner so a current customer books straight with their rep. Both require Teams or above. HubSpot lookup runs on Managed Events and needs the Calendly user to exist in HubSpot with a matching email, while Salesforce lookup routes on standard or custom Salesforce fields such as stage or account type.
Create a Fallback Route
Add a fallback destination so no submission dead-ends. Send visitors who match no rule to a polite message with a contact email or helpful content, or to a general event type. A common real example is a personal free email address that suggests the person is not a company buyer, which you can route to nurturing content rather than a sales calendar.
Test Every Routing Path Before Publishing
Walk every branch of the form yourself before it goes live, including the disqualified path. Routing that reads correctly on paper can still send the wrong people to the wrong place, and only a live walk-through catches it.
Connect Calendly to Your CRM and Business Tools
Connect Calendly to the system that owns your customer records so every booking becomes a trackable record. Decide what data maps where before you turn on the integration.
Connect Calendly With HubSpot
The HubSpot integration is available on all paid plans and logs Calendly meetings as activities on the contact timeline. When someone books, Calendly creates a contact if the email is new, and if the contact already exists, it adds the meeting activity without changing the contact’s details or owner. You can enable an option to push the meeting status, which shows whether a meeting was scheduled, completed, marked a no-show, or canceled, into HubSpot’s meeting outcome field. You map custom form answers to HubSpot properties with HubSpot Workflows, which requires a paid HubSpot tier.
The advanced piece, HubSpot lookup routing, is separate and requires Teams or above. It matches known contacts or companies to their assigned owner, runs on Managed Events, and depends on the Calendly and HubSpot emails matching.
Connect Calendly With Salesforce
The Salesforce integration is available on Teams and Enterprise. Install Calendly’s Salesforce package, connect it, and turn on the built-in flows so bookings sync to Salesforce. Your Salesforce edition needs the appropriate API access. Before enabling it, decide whether a booking should create or match a lead, a contact, or an opportunity, and map your fields to keep records clean. Salesforce lookup routing, which routes visitors based on Salesforce data, also lives on Teams and above and can be set up only by an organization owner or admin.
Use Zapier When a Native Integration Does Not Cover the Workflow
Reach for Zapier when native integrations cannot express your logic, but you do not want to build custom code. Zapier connects a Calendly trigger, such as a new booking, to an action in another app, covering spreadsheets, niche CRMs, and simple cross-tool automations.
When Do You Need the Calendly API or Webhooks?
Use the Calendly API and webhooks when you need custom logic that the native integrations and Zapier cannot handle. Calendly’s v2 API supports webhook subscriptions for events including invitee created, invitee canceled, invitee no-show, and routing form submission, among others, and you authenticate with a personal access token or an OAuth application. Teams use this for custom contact matching, region-based assignment, pushing marketing data into campaign fields, or triggering different downstream flows by event type.
Set Up Payments for Paid Meetings
Connect a payment provider and turn on payments per event type, then test both success and failure. Calendly handles scheduling while Stripe or PayPal processes the money.
Connect Stripe or PayPal
Connect Stripe, PayPal, or both, then enable payment on each paid event type. You can connect both providers to your account, but each event type uses only one. Money goes straight to your Stripe or PayPal account, because Calendly does not hold funds. For personal event types, Calendly uses the host’s connected provider, while shared or team event types use the organization owner’s provider, so each host generally connects their own Stripe or PayPal for their personal events.
Add Payment and Cancellation Terms
Set the price per event type and add your payment and cancellation terms so expectations are clear at checkout. Coupon codes work with Stripe, not PayPal. Refunds, tax handling, and enforcement of your cancellation policy happen in Stripe or PayPal, not inside Calendly.
Test Successful and Failed Payments
Run a real end-to-end transaction, then force a failure. On success, the meeting confirms, and the transaction appears on the Meetings page. On failure, the booking does not complete, as intended. If a paid event isn’t prompting for payment, the usual reasons are that payment was never enabled for that event type or the provider isn’t connected.
Scenario for a paid consultation. Booking, Calendly checkout, payment through Stripe, confirmation, calendar event, then an automated follow-up. If the card fails, no meeting is booked, and the slot stays open.
Add Calendly to Your Website and Embed Your Booking Page
Choose the embed method that matches the page, then track the bookings so you know what your website produces. A direct link suits email. Your website usually wants an embed.
Direct Link vs Inline Embed vs Pop-Up
Match the method to the context. An inline embed places the scheduler directly in the page. A pop-up widget adds a floating button that opens the scheduler. A pop-up text opens the scheduler when someone clicks a link. You also choose between a landing page embed that shows all your event types and a booking page embed that shows a single one. To embed Calendly and seamlessly add it to your site, generate the embed code from your account and paste it into the page.
Embed the Right Event Type or Scheduling Page
Embed one specific event type on a page with one job, and reserve the full landing page for a general book-a-meeting page. A pricing page should embed the demo event type directly rather than a menu of every event type, since fewer choices tend to convert better.
Track Calendly Bookings With UTM Parameters and GA4
Add UTM parameters to your Calendly links and connect analytics so bookings map back to source. UTMs show which campaign or page produced a booking, and passing that data into GA4 or your CRM makes Calendly a measurable part of your funnel.
| Booking method | Best use case | What to test |
|---|---|---|
| Direct link | Email, chat, social bio | Link opens the right event type |
| Inline embed | High-intent landing pages | Scheduler loads and books on the page |
| Pop-up widget | Any page, persistent access | Floating button opens and books |
| Pop-up text | Inline text calls to action | Link triggers the scheduler correctly |
Share Your Calendly Scheduling Link
You do not need a website to start booking meetings. Share your scheduling link directly by email, chat, or in your social bio so people can access Calendly and pick a time. You can also add a link to your Calendly booking page in your email signature, so every message becomes a way to book a meeting.
Test Your Calendly Setup Before You Publish
Run one complete real booking through every step before you share the link. Testing is the step teams skip most, and every failure in this guide is cheaper to catch in a test than in front of a customer.
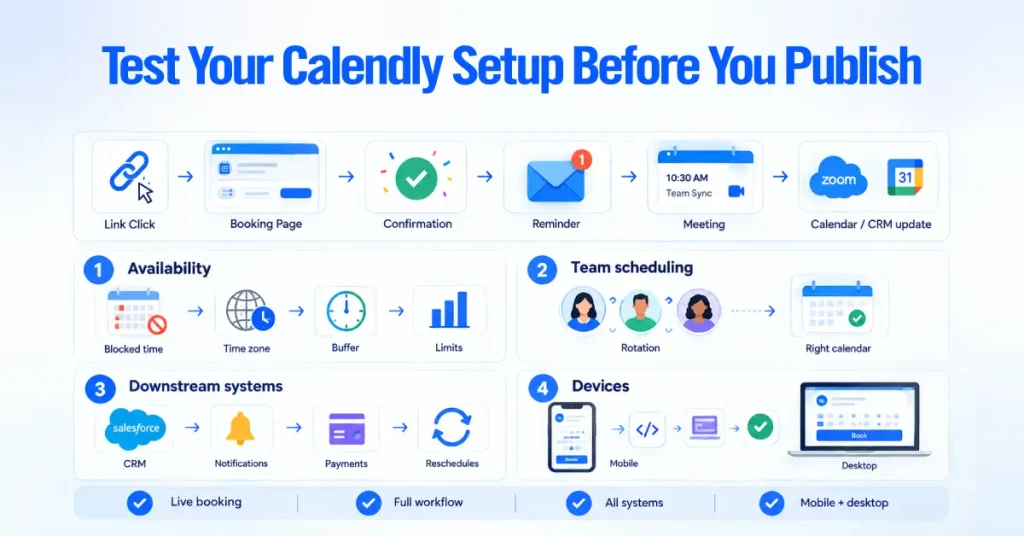
Book yourself through the live link exactly as a customer would, and follow the whole chain rather than relying on a preview.
- Availability rules. Block a time and confirm it disappears. Change your device time zone and confirm the page adjusts. Book near an existing meeting to check buffers. Hit a meeting limit to confirm the cap holds.
- Team scheduling. Book several times against a team event type and confirm the rotation spreads across hosts as configured, with each meeting landing on the right calendar.
- Downstream systems. Confirm the booking creates the CRM record, reminders arrive on schedule, a paid event charges, and a reschedule updates both the calendar and the CRM.
- Devices. Book once on a phone and once on a desktop, checking the embed, the payment step, and the confirmation on both, since many invitees book on mobile.
Common Calendly Setup Mistakes
Most Calendly problems trace back to a short list of avoidable setup errors.
- Connecting the wrong calendars: Connecting an empty or secondary account, or leaving a real calendar out of the conflict check, leads to double bookings. Confirm the connected account holds your meetings and that you have selected every relevant calendar.
- Leaving too much availability open: Wide-open availability invites bookings at times you never wanted. Set real working hours, a minimum notice, and meeting limits.
- Creating too many event types: Overlapping event types confuse invitees and fragment your data. Keep only the ones tied to a real booking reason.
- Skipping buffers and limits: No buffers means no room to prepare, and no limits means one event type can consume your capacity. Add both, and avoid stacking two buffers on short meetings.
- Sending duplicate reminders: When both Calendly and your CRM send reminders, invitees get duplicates. Assign each message to one system and disable the other.
- Publishing without testing: A live test catches broken payment steps, missing CRM records, and misrouted leads before customers do.
What Should You Check After Calendly Goes Live?
Treat launch as the start of tuning. The first month of real bookings shows what test bookings could not.
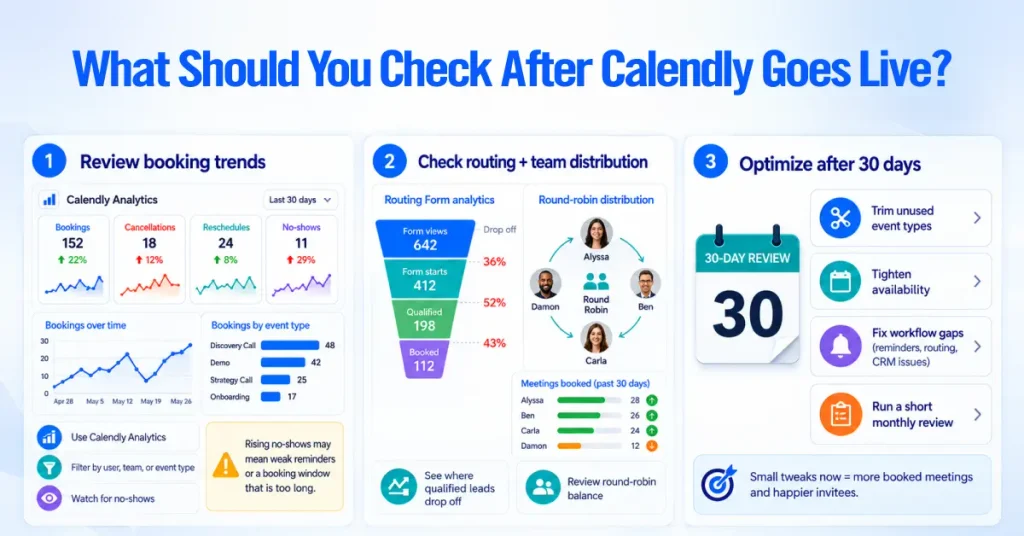
Review Bookings, Cancellations, and No-Shows in Calendly Analytics
Use Calendly Analytics rather than guesswork. Available to owners and admins on Standard and above, it tracks up to a year of created, completed, rescheduled, and canceled events, plus event distribution by duration, popular times, and event types. You can filter by user, team, or event type, and export to CSV. A rising no-show rate often points to weak reminders or a booking window that is too far out.
Check Routing and Team Distribution
On Teams and above, open Routing Form analytics from the Routing tab to see how form submissions turn into booked meetings, which tells you whether qualified visitors are actually booking and where a path is leaking. Review round-robin distribution to spot any host getting too many or too few meetings.
Review Your Setup After the First 30 Days
Adjust based on real data after 30 days. Trim event types nobody books, tighten availability where you feel stretched, and fix any reminder, routing, or CRM gap the live traffic exposed. A short monthly review helps you optimize the setup as the business changes.
When Should You Hire a Calendly Consultant?
Hire help when routing, CRM sync, payments, or team automation start interacting in ways that are hard to test. Simple setups do not need a consultant. Interconnected ones often do, because a small misconfiguration in one system can quietly break another.
When DIY Calendly Setup Is Enough
Do it yourself when you are one person or a small team with a straightforward flow. A solo consultant with a couple of event types, reminders, and payments can be live in an afternoon using this guide.
When Team Routing, CRM, Payments, or Automation Make Setup More Complex
Get help when several systems have to agree with each other. Round robin plus routing plus a CRM plus custom field mapping is where teams tend to lose time to trial and error, and where a booking silently failing to reach the pipeline has a real cost. Custom API or webhook work is worth doing right the first time.
What a Calendly Consultant Should Help You Configure
A consultant should configure the whole chain and prove it works. That means calendar hygiene and conflict rules, the right event types, routing logic tested on every path, CRM sync with clean field mapping and deduplication, payment flows tested for success and failure, and reminder workflows with no duplicates. Ask for a tested, documented setup rather than a connected account.